Q-Arm W/ Surgical Container

Overview
Leveraging advanced CAD technology, we intricately designed the Q-arm container with precision, following strict 3D printing specifications and subjecting materials to rigorous testing to meet exacting medical-grade standards. In addition to the meticulous design, we programmed the Q-arm to efficiently move the container, ensuring a controlled placement into the Sterilizer drawer. This integration of cutting-edge technology exemplifies our commitment to delivering a product that not only meets but exceeds the highest standards in medical equipment quality and functionality.
Reflection
In my role as the team manager, I focused on programming the Q-arm and contributing to the CAD design of
the Surgical Container. Using Python, we coded various functionalities for the Q-arm, achieving a
well-programmed result that exceeded medical standards.
Reflecting on this, I consider the coding decisions made for the Q-arm. Were there alternative
approaches or considerations that might have enhanced its performance? Additionally, in the CAD design
for the Surgical Container, what alternative choices could have been explored, and how might they have
impacted the final product?
In managing the team, I contemplate alternative strategies for programming the Q-arm that could have
achieved a similar or better outcome. How did the collaborative process influence the efficiency of
programming, and were there alternative approaches to foster teamwork?
Regarding personal growth, the experience of programming the Q-arm and contributing to CAD design has
shaped my understanding of technical project management.
Design Process
-
Programming
1. Requirements:
-Design a Python program that can control the q-arm robot to pick up, drop off, and rotate.
-Ensure the ability to perform functions manually using a potentiometer.
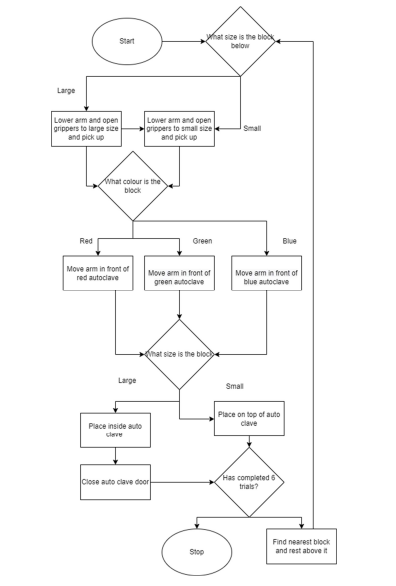
2. Created a Flow Chart and Wrote Pseudocode:
-Developed a visual representation of the program's flow.
-Drafted pseudocode for the three main functions: Pickup, Drop off, and Rotate.
3. Wrote Code:
-Implemented the Pickup, Drop off, and Rotate functions based on the pseudocode.
4. Tested and Troubleshooted Code:
-Executed tests to ensure each function behaved as expected. -Identified and resolved any errors or unexpected behavior during testing. -
Modeling
1. Requirements:
-Design a Surgical Container
2. Drew a Rough Container Sketch:
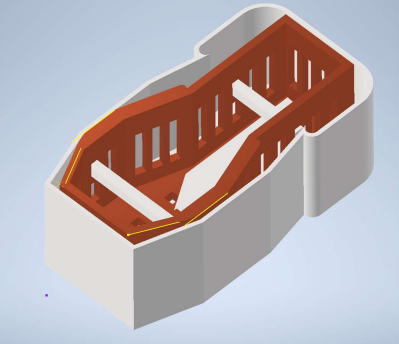
-Sketched a basic design, focusing on safety like adding a lip to prevent tools from slipping.
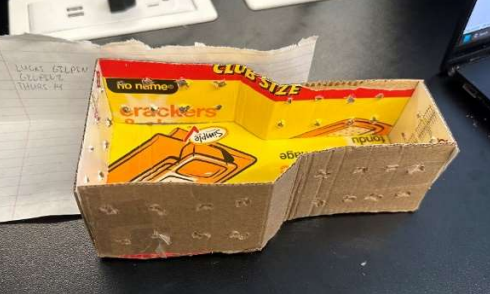
3. Made a 3D Model with Cardboard:
-Created a cardboard version based on the sketch. Checked if it was easy to use and fit well with the Q-Arm.
4. Fixed and Improved the Design:
-Made changes based on feedback from the cardboard model.
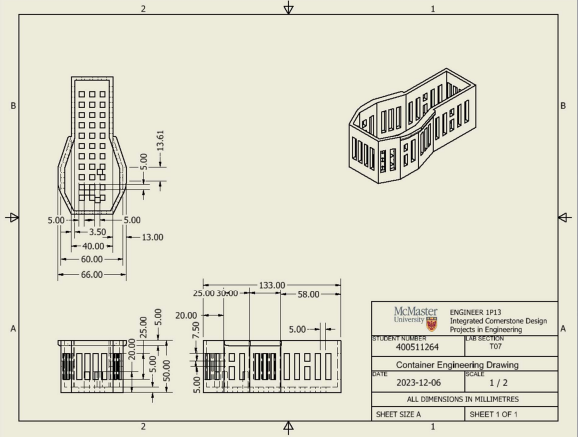
5. Used AutoCAD Inventor for Final Design:
-Used AutoCAD to make a detailed digital version. -Made sure the measurements fit the requirments.
6. Picked Material Using Granta:
-Chose a lightweight but strong material using Granta.
7. 3D Printed the Container:
-Printed the final design using a 3D printer.
Initial Surgical Container Prototype
Granta Material Selection Chart

Programming Flow Chart
Final Surgical Container Auto Cad Model
Final Surgical Container Engineering Design Drawing